The Ultimate Acoustic Foam Placement Guide for Podcasters and Gamers

Acoustic Foam Placement Guide for Podcasters and Gamers

Acoustic Foam Placement Guide for Podcasters and Gamers

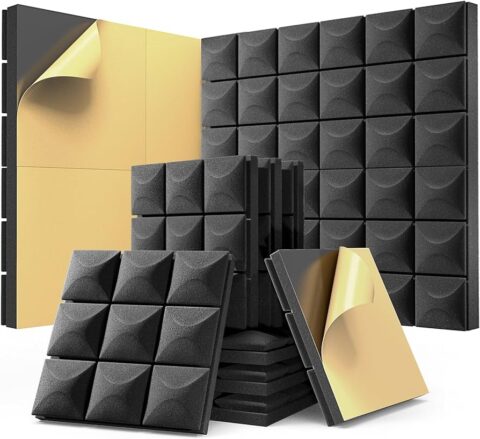
Are you a podcaster, streamer, or serious gamer? You know the frustration. Your expensive microphone picks up everything. It picks up the echo of your voice, your PC hum, and room noise. Buying Acoustic Foam Panels is only the first step. Smart placement is the real secret to clear vocals and immersive audio.

This guide gives you a clear plan. Set up your Acoustic Foam Panels to cut echo. This will reduce room noise. You will get professional, studio-quality sound that keeps listeners engaged.

The First Rule: Absorption, Not Soundproofing

Know the mission before you fit your first panel. Acoustic Foam Panels are for sound absorption. They stop reflections (echo/reverb) in your room. This improves the sound quality inside. They are not soundproofing. They will not stop a neighbor’s dog or traffic noise. You are stopping the reflections that make your voice sound hollow or muddy.

Why Placement is More Important than Quantity

Placing panels randomly in a small room is wasteful. You do not have to cover every square inch. Focus your panels on key spots. This stops the first and worst reflections from hitting your microphone. This targeted method gives you the biggest audio quality increase for your money.

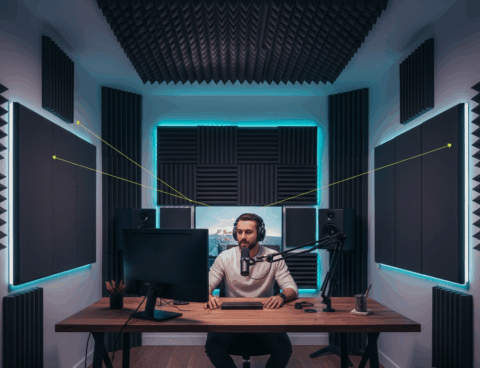
Finding the Sweet Spot: The First Reflection Points

The most important part of a foam setup is treating the first reflection points. This is where sound from your mouth hits a wall or ceiling. It then bounces directly into your microphone.

1. Marking Side Wall Reflection Points

These reflections ruin clarity and stereo imaging. They make your voice sound “smeared.”

The Mirror Trick:

  • Sit in your usual spot.

  • Ask a friend to hold a small flat mirror against the wall next to your microphone.

  • Have your friend slide the mirror along the wall.

  • Stop when you can see the microphone (or your mouth) in the mirror.

  • That is your first reflection point. Mark it.

The Solution: Install one large Acoustic Foam Panel on the left and right walls. Place it at that marked point. If you use speaker monitors, repeat this for the reflection points of both speakers.

2. The Ceiling Reflection Point

The ceiling is often overlooked. It is a damaging reflection surface. This is very true in low-ceiling rooms.

Locating the Spot: The spot is usually over your head. It might be slightly in front of your head. Sit in your chair. Have your friend hold the mirror on the ceiling. They move it until you see the microphone.

The Solution: Install a ceiling cloud. This is a panel or set of panels. Suspend it 2-4 inches below the ceiling over this point. Suspending the panels creates an air gap. This air gap improves their absorption. It works well on lower-mid frequencies.

Advanced Placement: Behind the Microphone and Monitors

You have tamed the first reflections. Now, focus on areas that add noise to your microphone.

3. The Wall Behind the Microphone

This is very important for podcasters and vocalists. Sound does not just move forward. It also moves backward. It hits the wall behind the mic. It then reflects into the back of the mic.

Placement Strategy: Cover a large area of the wall behind you. Install panels in at least a 3-foot by 3-foot area. Center this area behind your head. This setup cuts down the direct rear reflection. It gives you a tighter, purer vocal sound.

4. Monitor Area Treatment (For Gamers and Producers)

Gamers often have large monitors. The rigid screen is a large reflector. It bounces sound at your walls.

Placement Strategy: Put two smaller panels behind the monitor. Put them on the wall spaces to each side of the monitor. This absorbs sound reflecting off the screen. It stops new, complex reflections. This targeted method is key to a good foam setup for streaming.

Dealing with Bass and Corner Issues

Acoustic Foam Panels are not made to stop low-frequency buildup. You can still reduce some buildup in small, square rooms.

5. Corner Bass Traps (The Thickness Factor)

Low-frequency sound waves build up in the corners of your room. Thin foam cannot solve this.

The Solution: You need specific Bass Traps. These are very thick pieces of foam (often 8 inches thick). Or, use packed foam that fits in the corners. These are called dihedral corners. Install these in the corners closest to your microphone and speakers. This placement helps control low-end sound in a small room.

Final Checklist for Your Acoustic Foam Panels Placement

Your goal is to get maximum sound clarity. You do this by stopping the first sound reflections. Use this final checklist:

  • Sides: Use the mirror trick. Treat the reflection points on each side of your mic or listening position.

  • Ceiling: Have a suspended panel (cloud) hung over your head.

  • Rear Wall: Cover the wall behind your head or mic with a large panel. This controls rear reflection.

  • Corners: Place special Bass Traps (thick foam) in the front two corners. This tightens up any boominess.

This clear guide for installing Acoustic Foam Panels helps you. Your investment will give your audience a high-quality sound experience.

Wedge vs. Pyramid vs. Eggcrate: Which Acoustic Foam Panel Shape is Best for Your Frequencies?

Wedge vs. Pyramid vs. Eggcrate: Which Acoustic Foam Panel Shape is Best for Your Frequencies?

Wedge vs. Pyramid vs. Eggcrate: Which Acoustic Foam Panel Shape is Best for Your Frequencies?

Furnishing a studio, booth, or streaming room involves many choices. The shapes of Acoustic Foam Panels can seem confusing. The choice is not just about looks. The foam’s geometric surface has a technical job. It controls how the foam handles sound waves. You must know the differences between wedge, pyramid, and eggcrate foam. This knowledge helps you get the best sound quality for the lowest cost.

The Science Behind Acoustic Foam Panels

First, let’s define the role of Acoustic Foam Panels. They are made for absorption. They target mid- and high-frequency sound waves. These waves cause flutter echo and reverb. The panels have an open-cell structure. Sound energy passes into this material. Friction transforms the sound energy into tiny amounts of heat.

Why Surface Area Matters

The contours (wedges, pyramids, or ridges) maximize the panel’s surface area. This surface area faces the incoming sound waves. A flat foam panel is effective. A contoured panel of the same material and thickness is more efficient. The contours offer more material for sound waves to hit and enter. The foam’s shape affects how sound waves break up before they enter the material.

The Contours Defined: Breaking Down the Shapes

All shapes increase surface area. Their different geometries affect how they respond to sound waves. The angles and frequencies of the sound matter.

Wedge Acoustic Foam Panels

The wedge shape is the most common. It has sharp, angular teeth. These teeth run parallel to each other on the panel surface.

Technical Profile:

  • Geometry: Parallel ridges with steep peaks.

  • Acoustic Effect: The wedge design breaks up sound waves at a predictable angle. This provides very effective absorption. It works well for high-end frequencies where clarity is needed.

  • Best For: Critical listening areas, mixing rooms, and recording studios. People choose wedge panels for their predictable performance. They create a “deader,” more authentic acoustic space for mixing or mastering audio.

  • Aesthetics: Has a clean, directional, and professional look.

Pyramid Acoustic Foam Panels

Pyramid foam has symmetrical, four-sided pyramids. These are spread uniformly over the panel surface.

Technical Profile:

  • Geometry: Individual, square-shaped, pyramidal hills.

  • Acoustic Effect: The pyramid shape scatters sound uniformly before absorption. Sound waves hit the pyramid faces at many angles, no matter the source’s position. This controls off-angle reflections better than parallel wedges. They offer good broadband absorption in the middle and high-frequency range (500 Hz to 4000 Hz).

  • Best For: Live rooms, voiceover booths, and content creation setups. Pyramid panels are a good general-F. They work well where the sound source moves. They also work well where many fast reflections need control.

  • Aesthetics: Provides a uniform, multi-dimensional, and softer look than wedges.

Eggcrate (Convoluted) Acoustic Foam Panels

The eggcrate design costs the least of the three. It has soft, rounded peaks and valleys. It looks like the cardboard trays used for eggs.

Technical Profile:

  • Geometry: Soft, curved, wavy lines.

  • Acoustic Effect: This shape increases surface area. The gentle contours are the least effective at scattering sound waves before absorption. Their main job is to add absorptive material. They are not very effective below the very high-frequency range (mostly above 2000 Hz).

  • Best For: Low-budget projects. They are good for simple echo suppression in closets or small corners. They also line equipment cases. Eggcrate panels reduce high-end “chatter” or slap echo. They are for uses where acoustic accuracy is not the goal.

  • Aesthetics: Minimal, simple, and the least visually bold.

The Critical Factor: Panel Thickness

The shape affects how sound hits the foam. The panel’s thickness is the most important factor. Thickness defines which frequencies are absorbed. No amount of contouring can fix a lack of foam depth.

Why Thickness Determines Low-End Performance

Lower frequencies have longer wavelengths. A foam panel must be at least one-quarter (1/4) of the wavelength to absorb it.

A common problem frequency in small rooms is 250 Hz. The wavelength of 250 Hz is about 4.5 feet (1.4 meters). To absorb this frequency, the foam must be thicker than 13 inches (33 cm).

Thin (1-inch) Acoustic Foam Panels only absorb high frequencies. This is true for wedge or pyramid shapes. These thin panels stop reverb and echo. You need 3-inch to 4-inch thick foam to control mid-range frequencies (like 500 Hz).

Panel Thickness Typical Target Frequency Range Best Application
1-inch (2.5 cm) Mostly 2000 Hz and higher (Highs) Minor echo reduction, lining small objects.
2-inch (5 cm) 1000 Hz and higher (Highs and Upper Mids) Treating first reflection points in small rooms.
3-inch to 4-inch (7.5 cm to 10 cm) 500 Hz and over (Broadband) Critical mixing, vocals, and general room treatment.

Finding the Right Choice for Your Space

Ultimately, the best choice among Acoustic Foam Panels depends on your specific goals and budget:

  1. For Critical Listening (Mixing/Mastering): Select Wedge Foam with a thickness of 3 inches or 4 inches and position it at strategic reflection points to ensure maximum directional sound clarity.

  2. For General Use (Gaming/Podcasting/Voiceover): Select Pyramid Foam in 2-inch or 3-inch thickness. Its even scatter properties are good in controlling sound in less predictable environments.

  3. For Budget Control or Utility: Use Eggcrate Foam in a 2-inch thickness to manage high-frequency flutter echo without a significant investment.

By prioritizing thickness for low-end control and using the surface contour to fine-tune the mid-to-high frequency performance, you will make a wise choice that moves you closer to the professional, clear sound you are after.

What Foam to Use for an Acoustic Panel?

Acoustic Foam Panels

When designing a space for better sound control, whether it’s a recording studio, office, restaurant, or classroom, choosing the right foam for acoustic panels is essential. Acoustic panels help absorb unwanted noise, reduce echo, and improve sound clarity, creating a more comfortable and efficient environment. But with so many types of foams available, which one is best for an acoustic panel?

In this article, we will discuss the different types of foams used for acoustic panels, their properties, and how to choose the right one for your needs.

Types of Foam for Acoustic Panels

Types of Foam for Acoustic Panels

When selecting foam for an acoustic panel, it’s important to consider factors like density, thickness, and sound absorption properties. Below are the most commonly used foams:

1. Polyurethane Foam

Polyurethane foam is a popular material used in acoustic panels due to its affordability and effectiveness. It comes in various shapes, such as wedge, pyramid, and egg-crate designs, which help scatter and absorb sound waves.

  • Pros:
  • Lightweight and easy to install
  • Effective in absorbing mid-to-high frequencies
  • Available in different textures and colors
  • Cons:
  • Less effective for low-frequency (bass) sound absorption
  • Can degrade over time if not of high quality

2. Melamine Foam

Melamine foam is a high-performance acoustic material known for its fire-resistant properties and excellent sound absorption capabilities. It is commonly used in offices, commercial spaces, and public buildings.

Pros:

  • Fire-retardant and safe for various environments
  • Absorbs a wide range of frequencies
  • Lightweight and easy to shape

Cons:

  • More expensive than polyurethane foam
  • Can be fragile and require careful handling

3. High-Density Acoustic Foam

For professional settings like recording studios, home theaters, and music production rooms, high-density acoustic foam is preferred. This foam provides better sound absorption and helps control low, mid, and high frequencies.

  • Pros:
  • Excellent sound absorption, including low frequencies
  • Durable and long-lasting
  • Ideal for professional acoustic treatments
  • Cons:
  • Slightly more expensive than standard acoustic foams
  • Requires proper placement for maximum effectiveness

4. Bass Traps (Low-Frequency Absorbing Foam)

If you need to control low-frequency sounds (bass), bass traps are the best solution. These foams are denser and thicker, making them perfect for rooms with strong bass reverberation, such as recording studios and home theaters.

  • Pros:
  • Absorbs low-frequency sounds effectively
  • Helps balance the overall sound in a room
  • Ideal for corners where bass waves accumulate
  • Cons:
  • Needs to be used along with other acoustic panels for full sound control
  • Can be bulkier than standard acoustic foam panels

Choosing the Right Foam for Your Acoustic Panel

To select the best foam for your acoustic panel, consider the following:

  • Purpose: If you’re treating an office or restaurant, melamine foam is a great option. For recording studios or home theaters, high-density acoustic foam or bass traps are better.
  • Frequency Absorption: If you need full-range sound absorption, choose a combination of high-density foam and bass traps for best results.
  • Fire Safety: Melamine foam is a fire-retardant option, making it ideal for public spaces.
  • Aesthetic Appeal: Acoustic panels should not only improve sound quality but also enhance the visual look of a space. Choose foams available in various shapes and colors to match your décor.

Choosing the Right Foam for Your Acoustic Panel

Conclusion

When it comes to selecting the right foam for acoustic panels, understanding your space, sound needs, and budget is key. Whether you choose polyurethane foam for affordability, melamine foam for fire safety, or high-density foam for professional sound treatment, the right choice will help you achieve optimal noise control and sound clarity.

At Akcoustic, we offer premium-quality acoustic foam panels designed for various environments. Our expert team ensures customized solutions that blend functionality with aesthetics. Looking for the best soundproofing and acoustic solutions? Contact Akcoustic today and transform your space with high-performance acoustic panels!

The Best Ways to Use Soundproofing Foam Spray in Your Home

Soundproofing foam spray | Acoustic Solutions in Riyadh

Noise can be a significant distraction in our daily lives, whether it’s from the hustle and bustle of the city, loud neighbors, or the sounds of an active household. Soundproofing is the solution if you’re looking for ways to create a quieter, more peaceful environment. Among the various methods available, soundproofing foamed spray has become a popular choice for homeowners looking to reduce unwanted noise. This article explores the best ways to use this innovative product in your home and how Akcoustic can help you achieve the perfect sound environment.

What is Soundproofing Spray?

Soundproofing spray is a spray-on insulation material designed to absorb sound waves and reduce noise transmission between rooms or from the outside. It’s typically used to enhance the acoustics of various spaces, such as bedrooms, home offices, and entertainment rooms. The foam creates a barrier that absorbs sound rather than allowing it to bounce off hard surfaces, significantly reducing unwanted noise.

1. Home Theater Rooms

Home theatre rooms are one of the most common areas where the soundproofing spray is used. Whether you’re you’re watching movies or playing video games, creating an immersive experience requires a soundproof environment. By applying soundproofing foam spray to walls, ceilings, and corners, you can minimize noise from outside and prevent sound from escaping into other rooms. This will improve the acoustics and create a more enjoyable and undisturbed experience for you and your family.

The Best Ways to Use Soundproofing Foam Spray in Your Home

2. Home Offices for a Productive Workspace

If you work from home, you know how important having a quiet space for concentration and focus is. The sound of conversations, street noise, or even loud appliances can be incredibly distracting. Soundproofing spray can seal gaps around doors, windows, and walls, preventing noise from disrupting your workflow. Creating a quieter environment can boost productivity and improve your overall work experience.

3. Studios and Music Rooms

Controlling sound is crucial for musicians, podcasters, or anyone working in a creative audio-based field. Soundproofing spray is ideal for home recording studios, music rooms, or podcasting setups. It helps to create a more controlled environment by minimizing external noise while improving the room’s acoustics. This is particularly important for recording high-quality sound, as external noise can interfere with recordings, leading to poor audio quality.

4. Children’s Rooms and Play Areas

Children are naturally loud and energetic, and their play areas are often noisy. The sound can easily travel if you have a playroom or a children’s bedroom near a quiet space. Applying soundproofing foam sprays in these areas can significantly reduce the noise heard throughout your home. This is particularly useful for parents who want to create a peaceful environment while allowing their children to play freely without disturbing the rest of the household.

Conclusion

Reducing noise in your home doesn’t have to be complicated or expensive. Soundproofing foam sprays provide an effective and affordable way to create a quieter living space, whether for a home theatre, office, studio, or bedroom. At Akcoustic, we offer a range of custom-designed solutions that can be tailored to your specific needs. Our acoustic engineers and designers are ready to help you achieve the perfect sound environment in your home. Reach out to us today and discover how our products and expertise can transform your living space into a noise-free sanctuary.